FreeAPS X
Overview & Onboarding Tips
Table of Contents
Overview
FreeAPS X is an artificial pancreas system that is based on the OpenAPS (oref1) algorithm. It allows the use of this algorithm on an iPhone (iOS 14 and above). This is a completely different algorithm than the algorithm used by both Loop and the FreeAPS fork.
What does beta test mean?
You should not attempt to use this beta version of FreeAPS X unless you have a clear understanding of how DIY artificial pancreas systems work, are comfortable with the potential need to rebuild at short notice and are willing and able to provide detailed troubleshooting information to the developers when you have a problem.
If your experience of looping is that a friend once built loop for you on their aunt’s laptop, you should not be using this version of FreeAPS X.
- FreeAPS X is now in beta test: it has been tested by a group of individuals, but it is subject to frequent modifications
- FreeAPS X is a work in progress
- WARNING – do not modify the minimum Insulin Peak time without reading: Issue 108. Until that issue is fixed, if you set time too short, you may find you are getting red loops and your log files will be 100 times too big.
- The beta test version (v0.2.2) has initial Libre implementation. To get this you will have to rebuild.
- The beta test version (v0.2.1.1 on Oct 29, 2021 or later) has direct Dexcom support. To get this you will have to rebuild.
- If you switch from Nightscout to Dexcom, you must wait for 3 hours of data to be incorporated into the FreeAPS X data-stream before OpenAPS will allow you to close the Loop.
- You may need to scroll the plot all the way to the left to see incoming CGM data. After 24 hours of data are incorporated, then plot may look more like what you are used to seeing.
- When editing a bolus Amount value, if you backspace to change just the value to the right of the decimal, you’ll need to re-enter the decimal point when editing – easiest to just hit clear and type bolus fresh.
- This appears to be fixed for bolus amount in 0.2.1.1, but still a problem for other entries with decimal points – be aware
- The quick cancel of a bolus in the FreeAPS X app is similar to Loop – but you must tap on the square icon in the middle of the bolus progress icon
- FreeAPS X will update the IOB based on actual delivery from the interrupted bolus, but this may not show up until the next CGM reading is detected.
- In other words, do not panic when the IOB shows the full delivery of the interrupted bolus for the next 5 minutes.
Units
Before entering any values into FreeAPS X, select your units. The default is mmol/l.
- Tap Settings, Preferences and adjust Glucose Units to mg/dl if that is your system of units
- Please read the Initial Preferences and Advanced Preferences before modifying any other preferences from the defaults
- If you enter settings in the wrong units – you must delete them and re-enter upon change of this preference
Hardware
Please see the README for the most up-to-date information.
As of version 0.2.1.1 (beta), this was the state of required and supported hardware.
Computer
Access to a Mac (or Virtual Machine) – with Big Sur (11.x) operating system and Xcode consistent with your phone iOS, e.g., iOS 14.5 and higher requires Xcode 12.5
Because this code is early in development, you should be able to rebuild upon any announcement of a bug fix or new feature.
Smartphone requirements
All iPhones which support iOS 14 and up.
Simulators
- Start with FreeAPS X on your phone and use the simulated pump and simulated CGM
- Or you can read your actual CGM from your Nightscout site and control a simulated pump
- Get a feel for the layout of menus and decide if you want to continue
- Note – you can leave Loop or FreeAPS on the same phone controlling your actual pump and reading the same CGM – the two apps are distinct from each other
Supported pumps
FreeAPS X uses modified rileylink_ios library to control an insulin pump, thus supporting the same pump list as Loop:
- Medtronic 515 or 715 (any firmware)
- Medtronic 522 or 722 (any firmware)
- Medtronic 523 or 723 (firmware 2.4 or lower)
- Medtronic Worldwide Veo 554 or 754 (firmware 2.6A or lower)
- Medtronic Canadian/Australian Veo 554 or 754 (firmware 2.7A or lower)
- Omnipod “Eros” pods
To control an insulin pump you need to have a RileyLink compatible device: RileyLink, OrangeLink, Pickle, GNARL, EmaLink or similar device.
Supported CGM
- Direct support using Dexcom app on your phone (offline) (this is available for v 0.2.1 and later)
- Nightscout BG data source as a CGM (online, e.g., cell or WiFi connection)
- Before transitioning to FreeAPS X, make sure that you can get BG data from Dexcom (or other CGMs) to Nightscout
- Understand that FreeAPS X is driven by new CGM entries and without Cell or WiFi coverage it will not update – be prepared to go Open Loop for those situations
- Applications that mimic Nightscout as a CGM (apps like Spike and Diabox) (Offline, e.g., local on your phone)
- Follow instructions here
- If you build xDrip4iOS with the same bundle identifier as FreeAPS X you get CGM local on your phone
Modify Nightscout
OpenAPS Pills and Forecast Display
After adding the plug-ins as discussed below, you also need to enable the display of these items. Under the Hamburger Menu, scroll down and select the desired options and then hit Save.
Show Plugins
- check the box by OpenAPS
OpenAPS
- optional to check the box by Color prediction lines (otherwise, they are the traditional purple)
On the main Nightscout display, click the three dots next to your timeframe horizon (2HR, 3HR, 6HR, 12HR, 24HR) and then enable “Show OpenAPS Forecasts”. Don’t see this option? Check and make sure you added this variable and that your FreeAPS X app has successfully run.
Nightscout OpenAPS Specific Variables
Review the Nightscout Documentation on OpenAPS specific variables to add to an existing Nightscout site. Note the different colored lines for different predictions are already part of Nightscout (ver 14.2.2).
Transitioning from Loop
Loop users with Dexcom G6 or Enlite sensors who transition to FreeAPS X will need to have a working Nightscout site since Nightscout will be your CGM until other CGMs are integrated into FreeAPS X.
DIY Nightscout:
Log into your Heroku account, and tap Settings/Reveal Config Vars.

Make the following changes (copy and paste the values between the ” “)
| Config Var | Value |
| BRIDGE_INTERVAL | “20000” |
| BRIDGE_PASSWORD | your Dexcom password |
| BRIDGE_SERVER | this can be left blank if you’re in the US, or you can use “EU” if outside of the US |
| BRIDGE_USER_NAME | your Dexcom username |
| ENABLE |
|
| SHOW_FORECAST | “openaps” |
| SHOW_PLUGINS | add “openaps” |
Some of the config vars above may already exist, while others may need to be added. To edit an existing config var, use the pencil symbol. To add a config var, scroll to the last row and use the blank config var. Click enter when you’re done.

Nightscout as a Service:
T1Pal: Log into your account
- On the Welcome Screen, scroll down to Step 2>Go Beyond CGM
- Where it says: Visualize Therapy, make sure it says Yes
- Tap the openaps/AndroidAps button and Save Changes
- The OpenAPS displays should all be configured including colored forecast lines
Click on this link for more information about T1pal menus.
Current Implemented Features
Please see the Current State of FreeAPS X in the README file for the most up-to-date information.
What's Not Yet Implemented
Please see the Plans for the Future section in the README file for the most up-to-date information.
For known issues (bugs) and feature requests, please review: https://github.com/ivalkou/freeaps/issues
Getting Started Reference Information
- Information about this project
- FAQ and answers
- Telegram Channel listing Versions Updates : FreeAPS X News
- Telegram Channel for discussion : FreeAPS X discussion
- Code Repository: https://github.com/ivalkou/freeaps
Prerequisites Before Building FreeAPS X
THIS IS IMPORTANT – USERS NEED TO UNDERSTAND HOW THE ALGORITHM WORKS TO USE IT SAFELY!
FreeAPS X uses the original JavaScript files of oref0 and provides a user interface (UI) to control and set up the system.
Translation:
The internal decision making of FreeAPS X matches that of OpenAPS but the “rig” discussed in the OpenAPS documents is replaced by the iPhone and RileyLink compatible device. Selection of Preferences, Settings and Meal Entry is done locally with your iPhone; you do not need to edit json files as discussed in the OpenAPS documents. Some remote entry via Nightscout is still possible.
- Thoroughly read the OpenAPS documentation site to understand how the algorithm works.
- Read the Understanding How OpenAPS works section
- Play close attention to Preferences & Safety Settings section
- Pay close attention to the Autosens section
- Pay close attention to the Autotune and Understanding Autotune sections
- Pay close attention to the oref1: SMB and UAM section
- These two links to posts on diyps dot org are found among the pages just listed, but here’s another chance to read them:
Crowdin Translation Project
Please help by adding your language to the translation project for FreeAPS X. See this link for the current status of languages and to sign up to help.
The overall percentage complete for all languages is:

Don’t worry when you see the localized number go down – that probably means a new language has been added.
Onboarding Overview
If you are not an experienced DIY closed-loop system user, please wait until the code and documentation has passed the beta-test point. These instructions are slanted towards Loop Users and point to some of the LoopDocs pages.
Even if you are an experienced Loop user, plan to take this a step at a time – the algorithm, interface and displays are very different from Loop.
The figure below is the initial screen (other than the disclaimer screen) that you see once you build FreeAPS X.
- The main FreeAPS X screen is shown on the left and the Settings Screen on the right
- The icons at the bottom of the main screen in Open Loop are, from left to right, Carbs, Temp Target, Bolus, Manual TB, Settings
- The Manual Temporary Basal icon is only present when the Setting for Closed Loop is disabled

Preferences
You should tap on Preferences and adjust Glucose Units to mg/dl if that is your system of units.
Otherwise, please read the Initial Preferences and Advanced Preferences before modifying preferences from the defaults.
Pump
The pump choices are Simulator, Omnipod and Medtronic. Please build the simulator first to learn the menu structure and user interface.
STOP: Do not proceed with a real pump until you’ve worked with the simulator and stepped through all the links about OpenAPS. You are responsible for doing your own training.
When you do add a real pump consider Rufus the Bear.
To switch from the simulator to a real pump, tap on Settings, Insulin Pump Simulator, scroll to the bottom of the screen and tap Delete Pump and then add your pump.
Note that all the changes you’ve made with the simulator will still be there when you add a real pump. (Graphic under Initial Preferences shows the default values.)
- If you left preferences at the default values and have entered realistic values under settings, you can just delete and add a pump
- Check to make sure all your settings and preferences are reasonable – those basal rates will be loaded to the pump when you add it and for Medtronic, the CR, ISF and Delivery Limits will be loaded as well
- If you want to restore all settings and preferences to the default, consider deleting the app completely and building fresh
STOP: Do not proceed with a real pump on your body until you have completed reading about OpenAPS and understand the determine-basal logic.
When ready to attach a real pump, the pump menus are similar to those from Loop. These LoopDocs pages may be helpful:
- Medtronic Pump
- Omnipod
- The Confirmation Beeps option is more user-friendly than on Loop
- Except for these cases, the pod remains silent when Confirmation Beeps are Enabled
- Manual bolus upon start and completion of bolus (SMB and temp basal are silent)
- Suspend
- Resume, Change Time Zone, Sync Basal Schedule to Pod beeps at start and end of loading scheduled basal rate to pod
- Read Pod and other Diagnostics (bottom of Pod Settings menu) beeps at start and end the action
- The normal pod beeps that happen regardless of the Confirmation Beeps setting are unchanged, e.g., Replace, Expiration and other near end of life beeps
Nightscout
If you want to have FreeAPS X information show up on your Nightscout site, be sure to select Allow Uploads.
If you are using Nightscout as a source of CGM data or if you are using xDrip4iOS as your CGM data:
- Assuming you configured your Nightscout site as detailed earlier, all that is required for this menu item is to enter your URL and API-secret
- Make sure there is no trailing / in the URL
- The box for Use Local Glucose Server should not be checked
If you are using Spike or Diabox, you must also do this
- Check the box for Use Local Glucose Server
- Set the port of a local server. Spike – 1979, Diabox – 17580
Pump Settings
This is where max basal and max bolus rates are set. To save the changes in FreeAPS X, you must tap Save on Pump. For Medtronic pumps, this copies these limits to the pump. For all pumps, these limits are checked by FreeAPS X as part of the determine-basal logic.
Basal Profile
Enter the basal profile you intend to use. Tap Save on Pump when done.
The scheduled rates on your pump match these settings and if you return to Open Loop, these will be the settings used.
Note – once Autotune is in use and enabled, the Autotune basal values will be used by FreeAPS X, but they are NOT copied to your pump.
Insulin Sensitivity
Enter the Insulin Sensitivity number you intend to use as a starting point – a single number is preferred for FreeAPS X (OpenAPS).
As FreeAPS X monitors your actual blood glucose response to entered carbs, a modified sensitivity shows up (Autotune – not on by default, see Autotune below) and (Autosens enabled by default).
Carb Ratios
Enter the Carb Ratio number you intend to use as a starting point – a single number is preferred for FreeAPS X (OpenAPS).
As FreeAPS X monitors your actual blood glucose response to entered carbs, a Calculated Ratio shows up (Autotune – this is not used by default, see see Autotune below).
Target Ranges
Enter the Target Range(s) you prefer.
Autotune
This menu allows you to run Autotune. You can choose whether to use the Autotune values or just review them (default is to just review them). You should be comfortable with the Autotune results before modifying default preference values discussed in Advanced Preferences.
Initial Preferences
If you follow along with the OpenAPS documentation links provided above, the items highlighted in red, solid-lined boxes are the ones that should be adjusted to configure your settings with FreeAPS X.
Note that the values shown in the graphic are the default values. You can use this for reference if you want to compare to the values on your system to the default values.
These are the parameters associated with the oref0 algorithms (UAM and SMB are not yet enabled). It is strongly recommended that you run in this mode long enough to ensure your settings provide good glucose control with limited lows and highs.
Note that Autosens is always enabled with the default range AutosensMin = 0.7 to AutosensMax = 1.2. Typically this should be left at the default values, but if you should choose to limit Autosens, modify one or both of the values. Setting both to 1.0 effectively disables Autosens.
First Set of Modifications:
- Set Glucose Units to your preferred units – if you entered values in the settings screens using the wrong units – go back and fix them now
- Select the insulin curve for the insulin you use in your pump
- Modify MaxIOB – leaving it at 0 units makes OpenAPS a low-glucose suspend system – follow the directions found here for selecting the Max IOB setting
- Delivery Limits: Max Bolus limits manual bolus per interaction
- maxIOB limits automated delivery of insulin via Temp Basal or SMB; it does not regulate how much insulin can be delivered by manual bolus
- Configure the Bolus Increment to match the minimum value available for your pump

Medtronic Pump
The location of this preference is not highlighted on the graphic, but if you are a Medtronic Pump user who is bothered by the alert at the top of each hour if a Temp Basal is set, you may want to slide the Skip Neutral Temps setting to be enabled.
Instead of a link, copying the text from OpenAPS docs:
In order to reduce notifications at the top of the hour, it will also attempt to cancel temp basals (unless BG or minGuardBG is below threshold and a zero-temp is needed) prior to the top of the hour. Normally a new temp basal will be set (if still needed) after the top of the hour, but that may be delayed if the rig has issues connecting to the pump. People who want to minimize the ‘on the hour’ temp basal notification beeps/vibrations may choose to accept that risk and choose to set skip_neutral_temps to true.
Exercise Mode
If you used Overrides in Loop, you’ll want to enable Exercise Mode.
The exercise “override” for OpenAPS differs from Loop in that only basal rates and ISF are modified – CR is left unchanged.
Note that Exercise Mode is a synonym for high_temptarget_raises_sensitivity.
- When enabled, a temp target > 105 mg/dL high temp target adjusts the sensitivityRatio for exercise_mode
- Sensitivity for FreeAPS X is calculated from the mid-point of the temp target range value minus 110 mg/dl referenced to the Half Basal Exercise Target value
- If the Half Basal Exercise Target is left at 160, and you set a temp target of 120 mg/dl, your basal rate will run at 75% and your ISF will be multiplied by 1.33 (e.g., 1/0.75)
- Temp Target of 120 = 75%; 140 = 60% sensitivity; 160 = 50% sensitivity
Using the Temp Target icon on the main FreeAPS X screen, you can configure some Exercise and PreMeal preset targets. You will want to use PreMeal as part of your meal bolusing protocol as discussed in Meals.

Advanced Preferences
In the graphic below, the items highlighted with grey dashed boxes may have been adjusted during the early days when you tested all your settings. See Initial Preferences.
Note that the values shown in the graphic are the default values. You can use this for reference if you want to compare to the values on your system to the default values.
Please make sure you understand Optimizing Your Settings before progressing.
After you’ve successfully run with FreeAPS X and adjusted settings and run Autotune, you can start to enable the items that control UAM / SMB aka oref1. Please follow the Understanding SMB and UAB before adjusting these settings.

Open Loop Testing and Displays
Open Loop is required when you need to verify settings, e.g., there’s an oscillation pattern and you don’t know why.
Reminder: Test basal first.
Open Loop Basal Testing
- Daytime:
- Leave your settings alone (restore maxIOB if adjusted)
- Go Open Loop (flip slider to disable Open Loop)
- Check suggestions regularly and decide what to enact
- Nighttime (use low glucose suspend mode):
- Modify the maxIOB setting to zero
- Go Closed Loop (flip slider to disable Open Loop)
Open Loop Displays
FreeAPS X is a work in progress. The documentation for the behavior of Open Loop displays will change based on the version number. To simplify keeping up with the documentation (and make it available to people still on the older version), the display details are found in a separate pdf file.
- FreeAPS X version 0.2.0 Open Loop Display characteristics.
Considerations for Users Transitioning from Loop/FreeAPS
Katie DiSimone wrote about OpenAPS as well as Loop. You may find this post particularly appropriate: https://seemycgm.com/2017/09/05/moving-between-diy-closed-loop-systems
Please read the Onboarding, Initial Preferences and Advanced Preferences sections first.
Please note that these are general considerations and observations from some early adopters who previously used Loop. As always, Your Diabetes May Vary (YDMV)!
The quantity labeled Insulin required may be the source of some confusion to those coming from Loop. Please review this section in the determine-basal logic page. (You have read that whole page already haven’t you?)
OpenAPS was originally designed to be used with Medtronic pumps using the pump bolus calculator and an Easy Bolus button. The calculation of Insulin required that FreeAPS X displays in the Enact Bolus screen, displayed (with default preferences) following carb entry, is not a bolus calculator in the same way that Loop has one.
- A bolus calculator is not part of the standard OpenAPS protocol
- When first starting out, with UAM and SMB disabled, the rule of thumb is to prebolus 60%-75% of your typical meal bolus (carbs/CR)
- As you progress, and eventually enable UAM and SMB, you may need to adjust that meal prebolus
- For more discussion about how to bolus for meals, read the Meals section
Add Carbs screen:
- As soon as you tap Add in the Add Carbs screen, the carbs are saved and FreeAPS X will use those for the Insulin required calculations
- There is no concept of entering a carb absorption time in OpenAPS, the algorithm estimates the carb absorption dynamically
Enact Bolus screen:
- First line: Insulin required
- Second line: Insulin recommended = Insulin required * Recommended Insulin Fraction (70% by default)
- Third line: empty
- If you tap on Insulin recommended, it is transferred to the Amount line
- To edit the Amount, best to hit Clear and type desired amount
Temp Basal
- When new CGM values arrive, FreeAPS X recalculates and may adjust Temp Basal and/or SMB assuming pump communication is possible
- If CGM or pump communciation stops, the last issued Temp Basal expires at the end of its duration and the pump returns to the scheduled rate
- The maximum time for a temp basal above scheduled rate is 30 minutes
- The maximum time for a zero temp basal is 120 minutes
Know how to cancel a bolus
- If you enacted a bolus and you’ve changed your mind, you must tap on the square icon inside the progress indicator
- It is not like Loop where you can tap anywhere on the line
- FreeAPS X will update the IOB based on actual delivery from the interrupted bolus, but this may not show up until the next CGM reading is detected.
- In other words, do not panic when the IOB shows the full delivery of the interrupted bolus for the next 5 minutes

Keep Nightscout Profiles in Sync
FreeAPS X does not current upload profile changes (basal, ISF, CR) to Nightscout like Loop does. If you’ve never handled that manually, use the duplicate button instead of Add (blank profile) or editing the time.
This page in Nightscout docs is useful for reference.
Quick Taps from Main Screen
In addition to the toolbar at the bottom of the screen, there are some locations (see dashed boxes in graphic below) for quick access to other information.
- Tap in area of the BG, the CGM screen is opened (known to work with Nightscout as a CGM – not sure about other CGM options)
- Tap in the area of the pump reservoir/life or battery and pump menu opens (known to work for Pod – not sure about Medtronic)
- Tap in area of the Loop and the last enacted item displays (swipe up to dismiss)
- Tap in main screen area to see the history for Carbs, Temp Basal and Bolus
- You cannot edit a carb entry, but you can delete it and add a new carb entry with a different value and/or time

More hints are provided in the Settings and Meals sections
- Please, don’t let these hints be your only source of information
- Please, read the OpenAPS documents and the More Reading documents
- There is an active discussion ongoing in the FreeAPS X discussion group – you should check this daily for updates and information
FreeAPS X can use Nightscout BG data source as a CGM (there are other options – not yet added this documentation)
- If you currently Upload Readings to get your BG data from Loop to Nightscout, this will not work for FreeAPS X
- If you have removed “bridge” from your Heroku enable config var, you need to add it back
- If you have removed your bridge username, bridge password, and bridge server from your Heroku config vars, these will also need to be added back
- Before transitioning to FreeAPS X, make sure that you can get BG data from Dexcom (or other CGMs) to Nightscout
Settings
- One general observation is that your CR, and possibly ISF, setting may need to be made more aggressive (lower the number). A fair number of former Loopers have noticed this change when they transitioned over to FreeAPS X.
- In general, basal rates seem to stay fairly consistent coming from Loop, provided your rates were fairly accurate to start with.
- Ensure you have the proper Bolus Increment setting for your pump (see Initial Preferences).
- If you follow the OpenAPS docs, you will leave most of your preferences at their default values to ensure your settings are correct as discussed in Initial Preferences
- You will want to modify MaxIOB which defaults to 0 units – this makes OpenAPS into a low-glucose suspend system
- Please follow the directions found here for setting Max IOB setting
- Delivery Limits: Max Bolus limits manual bolus per interaction
- maxIOB limits automated delivery of insulin via Temp Basal or SMB; it does not regulate how much insulin can be delivered by manual bolus
- Once you’re ready to progress, follow the OpenAPS docs as you turn on the more advanced settings discussed in Advanced Preferences
- Keep the default Max SMB Basal Minutes and Max UAM SMB Basal Minutes to start
- Gradually increase these after some observations of a few meals (by no more than 15 min increments each time, then observe)
Meals
If you are coming to FreeAPS X from Loop, the bolusing strategy for FreeAPS X is different so plan to spend some time changing your habits.
Please read Users Transitioning from Loop first (even if you have never used Loop); you need the knowledge found there.
The quantity labeled Insulin required is discussed in this section on the determine-basal logic page.
Terminology
The graphic below shows FreeAPS X in use after SMB and UAM are enabled. These were turned on only after settings were tested.
In this case, breakfast was ready “too soon”. I was late with my PreMeal Temp Target and food was prepared faster than my normal prebolus time. Despite these shortcomings, FreeAPS X handled it – this meal was completely hands-off after the prebolus.
The items shown on this graphic have abbreviations across the bottom of the main FreeAPS X screen. The legend added to the graphic spells out the names used in the OpenAPS documentation for these quantities. Links are provided below for each quantity.

Explanation of Quantities Plotted on FreeAPS X Screen:
- BG = Blood Glucose values from your CGM
- For these links, you will need to click on the arrow to open up the explanation
- IOB = IOBpredBGs
- ZT = ZTpredBGs
- COB = COB predBGs
- UAM = UAMpredBGs
- arrow = eventualBG
Meal Entry
Always try to use an Eating Soon temp target for about 60 min before you want to eat your meal.
- This target should be low enough to have an impact on getting some insulin on board
- Example, if your usual target is 100, set your eating soon target to 80
The calculation of Insulin required, which FreeAPS X shows in the Enact Bolus screen, is not a bolus calculator.
Future dating (time stamping) of Carbs is not required for FreeAPS X; it’s OK to enter carbs when you prebolus.
For FreeAPS X, a good place to start, once your settings are fairly solid, is to initiate a prebolus for your food for about 60% to 75% of Carbs/CR
The balance of the insulin needed will be provided by Temp Basal (initial settings) or SMB and Temp Basal (once advanced settings are configured).
Rather than pull out a calculator:
- One pre-bolus strategy might be to form a little scale for yourself like the following (you should form your own based on your needs and CR):
- Small meal, 20g or less = 2U
- Med meal, 20g – 40g = 3U
- Large meal, 40g or more = 4U
- Note: Your scale will be based upon your carb ratio and the % of upfront bolus that you prefer. For example, with a carb ratio of 10, the rates above would provide a 100% upfront bolus for 20g, a 75% upfront bolus for 40g, and a 67% upfront bolus for 60g
- With an appropriate pre-bolus and settings, you should not need to issue manual boluses after your meal
- Try to let FreeAPS X do its job
- This may be a difficult task coming from Loop!
- If you used automatic bolus with Loop or the FreeAPS fork, you’ll find Temp Basal a little slower than you are used to, but it’s worth taking the time to test and adjust your settings before you turn on SMB/UAM
- Observe for a few days and make adjustments as needed so that you won’t have to issue correction boluses
More Advice
Copied from Telegram Discussion Group (source: Tim Street)
Note that Tim’s comments are primarly directed at people who have progressed to turning on UAM/SMB features.
- Settings are generally not directly transferable from Loop to oref1. You’ll generally find that CR tends to being a slightly lower value, and ISF may also.
- Autosens is the dynamic adjustment of basal and ISF based on the most Conservative estimate of looking back at the last 8 and 12 hours.
- Information about Autosens, meals etc can be found here: http://www.apsguide.info
- Autotune is a one off that runs once daily to review and renew basal, ISF and CR based on input data for the previous day.
- Scheduled is just what’s on the pump.
- For meals, you will need to bolus ahead of the meal (unless using ultra rapid insulins) and usually 60%-75% of meal bolus.
- The function Ivan has built to give a bolus is not a bolus calculator in the same way that Loop has one, so don’t expect it to give you enough insulin.
- What Ivan has done is to take the insulinReq calculation and use it to provide a bolus estimate. The insulinReq value is calculated based on a number of prediction curves, and when carbs are added, it mediates the effect of carbs with the other curves. So the insulinReq value is not necessarily as much insulin as the normal meal bolus would be (it’s conservative for safety reasons). It’s not a bolus calculator.
- The recommendation with oref1 (and the way most use it) is to bolus 60%-75% of required bolus and leave the algorithm to deal with variation in absorption.
- I personally always used the easy bolus option on the Medtronic pump to give 2, 4 or 6 units dependent on the meal size, then left oref1 to get on with the rest.
Build FreeAPS X
Stay Informed
FreeAPS X is in active development and changes frequently. Users are advised to follow the FreeAPS X discussion Telegram group to stay informed. This is also the main support group fro FAX.
Updates have previously been announced in the FreeAPS X News Telegram group. It is currently not actively maintained with every release, so for now, please watch the FreeAPS X GitHub Releases page to keep track of new releases.
When you are logged into your GitHub account, you can subscribe to release notifications from GitHub by clicking Watch → Custom and check the Releases checkbox: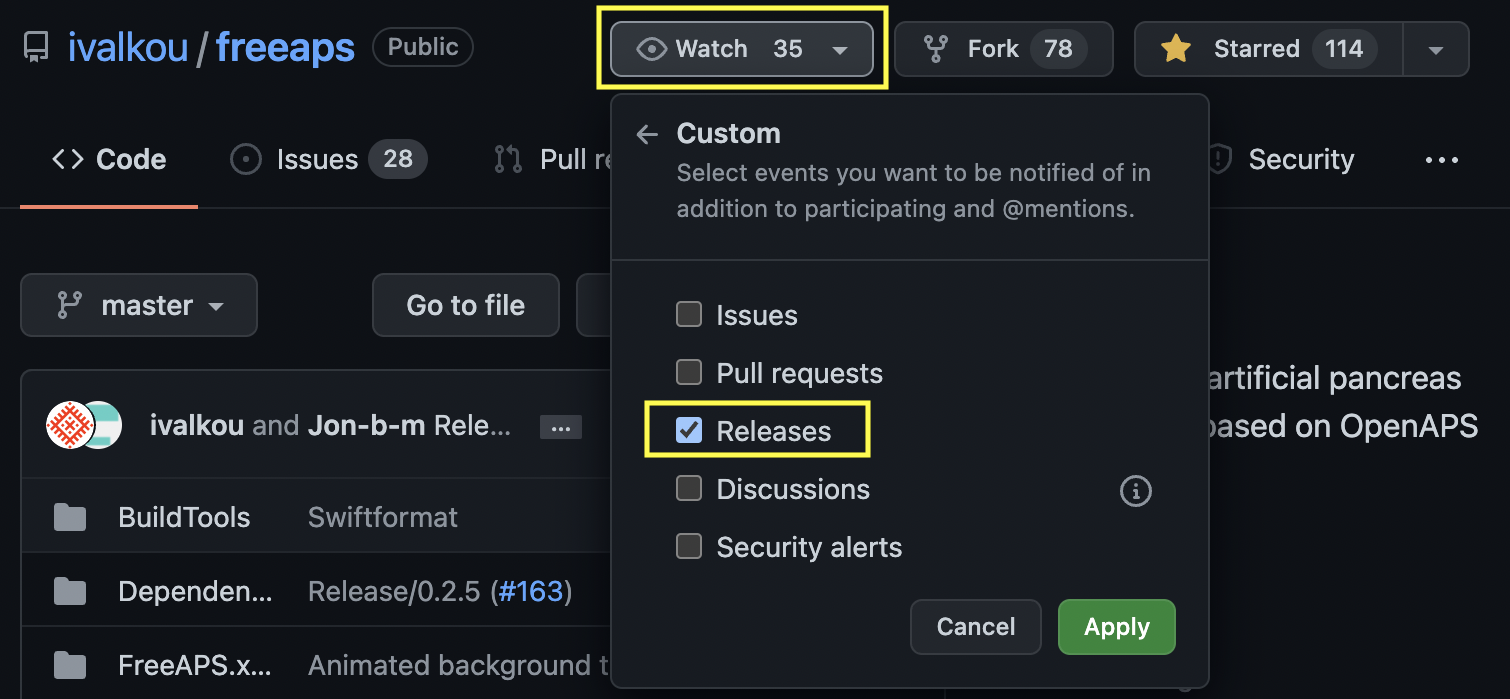
Releases are made as “Stable versions” and “Beta versions”. The FreeAPS X README file describes the difference between Stable and Beta versions like this:
A stable version means that it has been tested for a long time and does not contain critical bugs. We consider it ready for everyday use. Stable version numbers end in .0.
Beta versions are the first to introduce new functionality. They are designed to test and identify issues and bugs. Beta versions are fairly stable, but may contain occasional bugs. Beta numbers end with a number greater than 0.
Getting Ready to Build:
If you do not have a Mac (or Virtual Machine) with Xcode ready to use, you may find the Build Step 1 through 9 in LoopDocs helpful.
Download Directions:
Please use the BuildFAX script for trouble-free building of FreeAPS X. It is similar to other build scripts from Loop and Learn, but this one will specifically help you build FAX. A set of Utility scripts are also provided as an option in this script, briefly described at the end of the build instructions.
To run the script, please click the “Copy” button below. Then paste the copied contents into a Terminal window. Hit enter, and follow the instructions.
BuildFAX script:
/bin/bash -c "$(curl -fsSL https://raw.githubusercontent.com/loopnlearn/LoopBuildScripts/main/BuildFAX.sh)"
Just follow the instructions in the script. Most users should select the MASTER branch. This will get you the latest release. This may be a stable version, or a beta version.
In the end, please select 1 to open Xcode. This will open the correct file for you (there are two types, the FreeAPS.xcworkspace file is the correct one), and you will avoid an otherwise very common build error. It also assures your freshly downloaded code is used, and not some old download you have laying around (perhaps the second most common error).
This page will be opened in the background in your default browser to be easily accessed if the script is launched without starting from here.
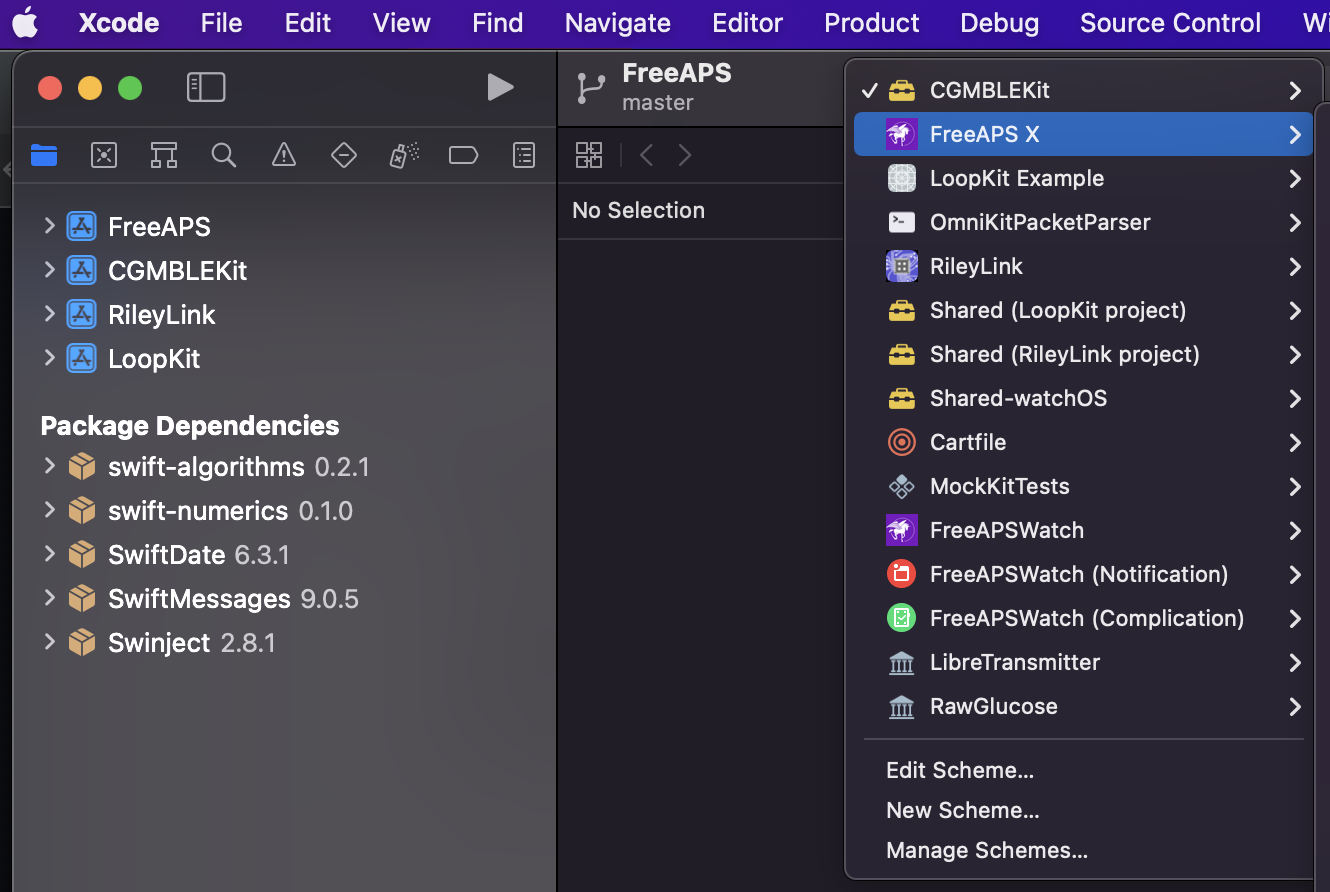
When Xcode opens, first make sure to select the correct scheme. For now, the default one when building the master branch is “CGMBLEKit”, see yellow highlighting below:

Click on the CGMBLEKit scheme and select FreeAPS X:
Then expand the FreeAPS project in the Project navigator, and select the ConfigOverride file: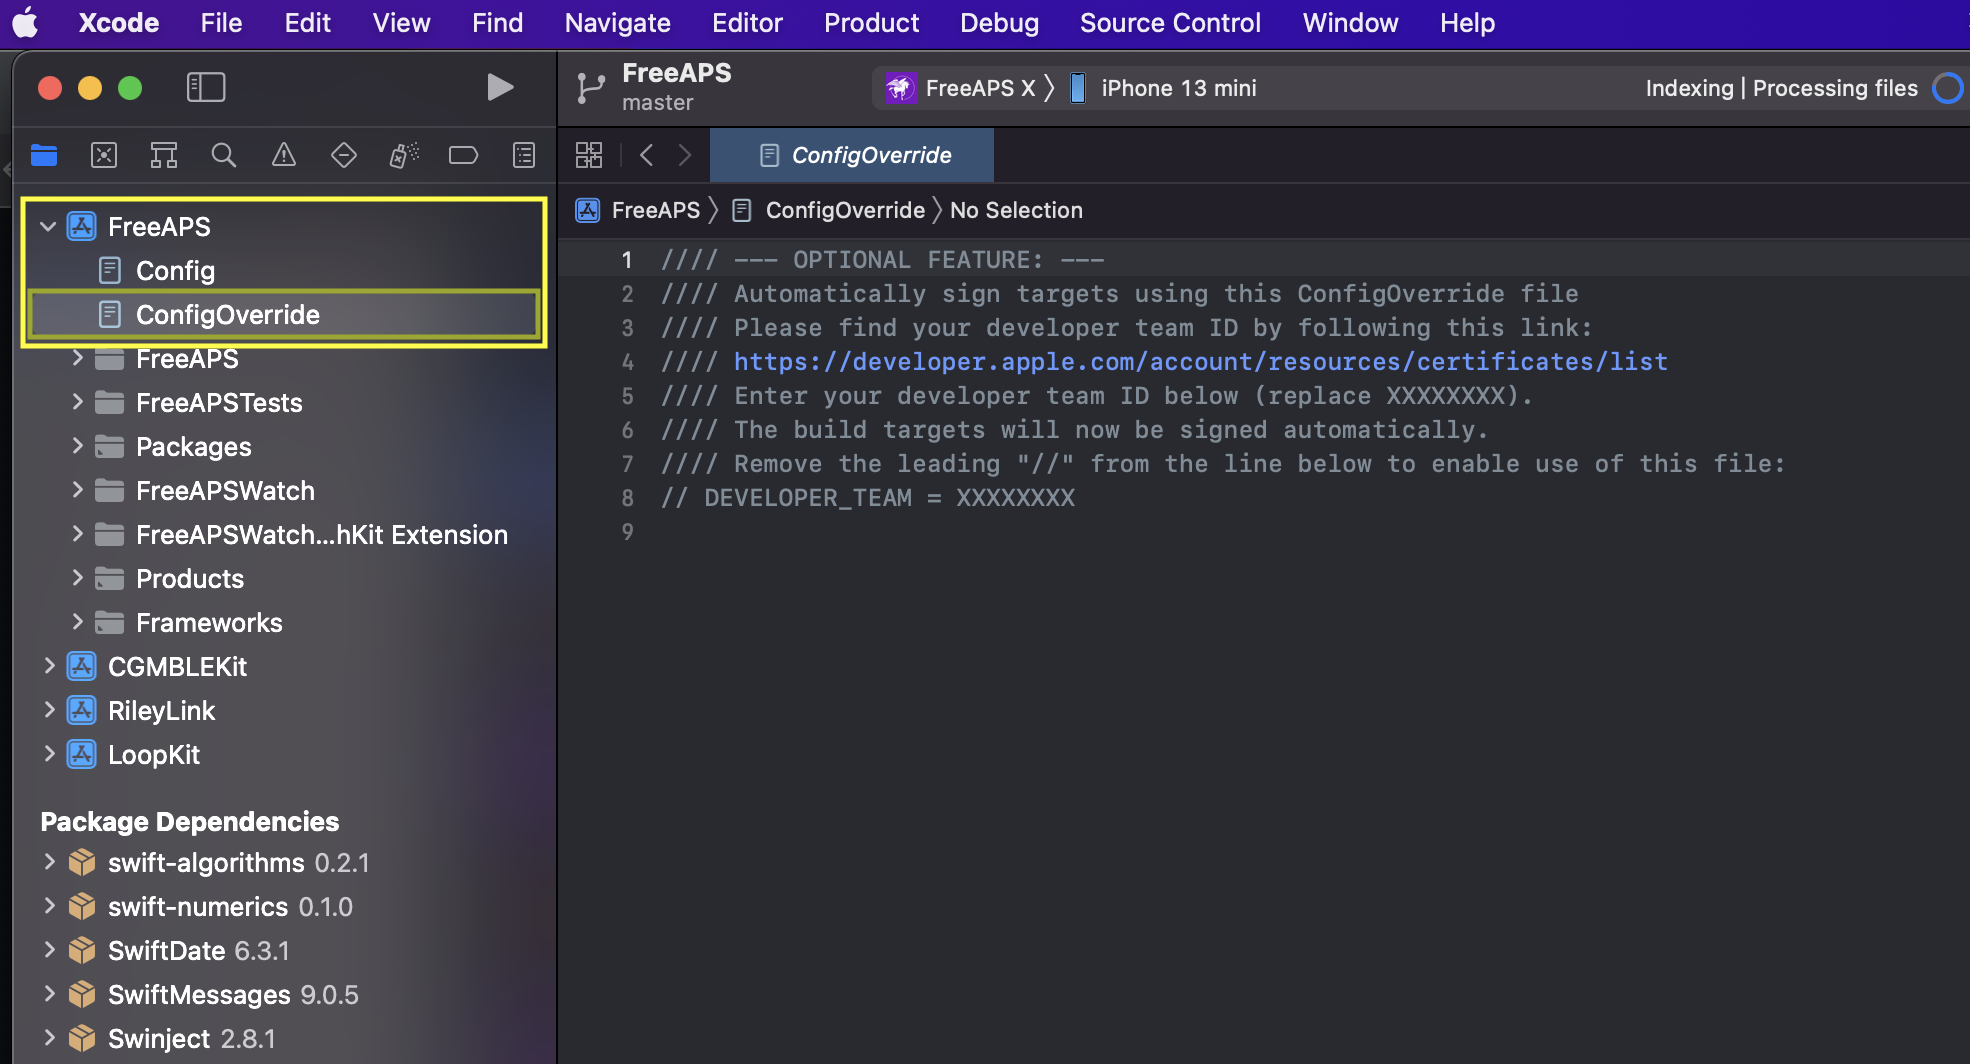
You will now make a small change to the ConfigOverride file:
First, find your developer team ID by logging in to your Apple Developer account. It is found in the upper right hand corner from this link: https://developer.apple.com/account/resources/certificates/list
Please also make sure to accept any pending Apple Developer Agreements or Program License Agreements while you are logged in, otherwise you may not be able to build. You will typically have received email notifications if that is required.
The developer team ID is not your full name or your email address. It is an alphanumeric code of ten characters, and may look something like this: 123A4BCDE5
Copy the developer team ID, and paste it into line number 8, replacing the XXXXXXX marked in green below. Finally, please delete the leading double forward slash // signs from line number 8, marked in red below:
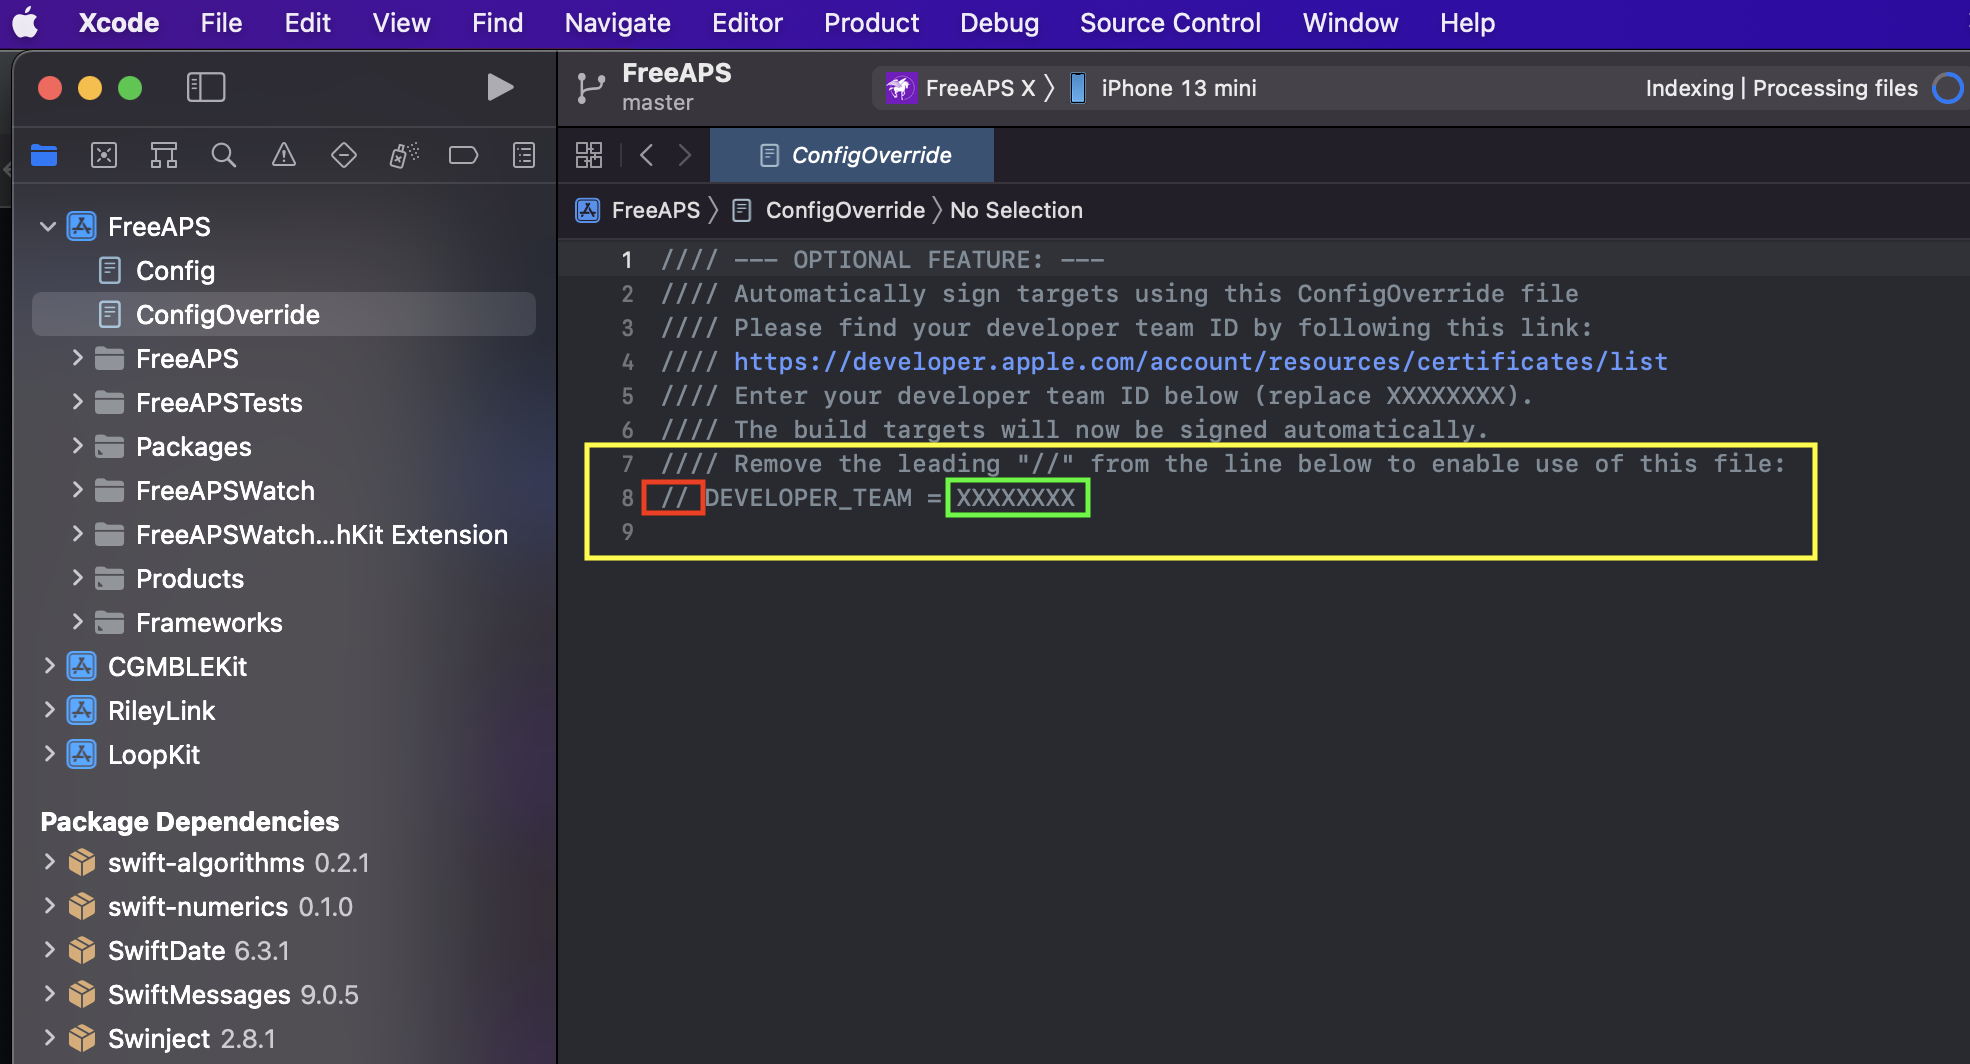
It should look like this in the end: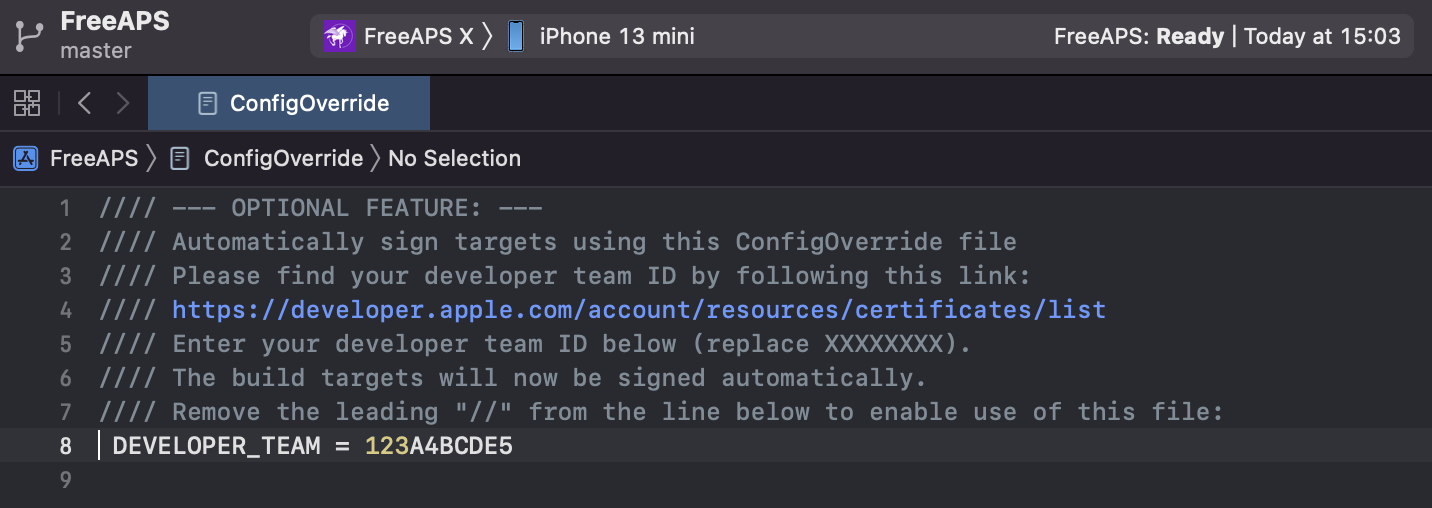
The build targets will now be automatically signed, and you do not need to make any other changes.
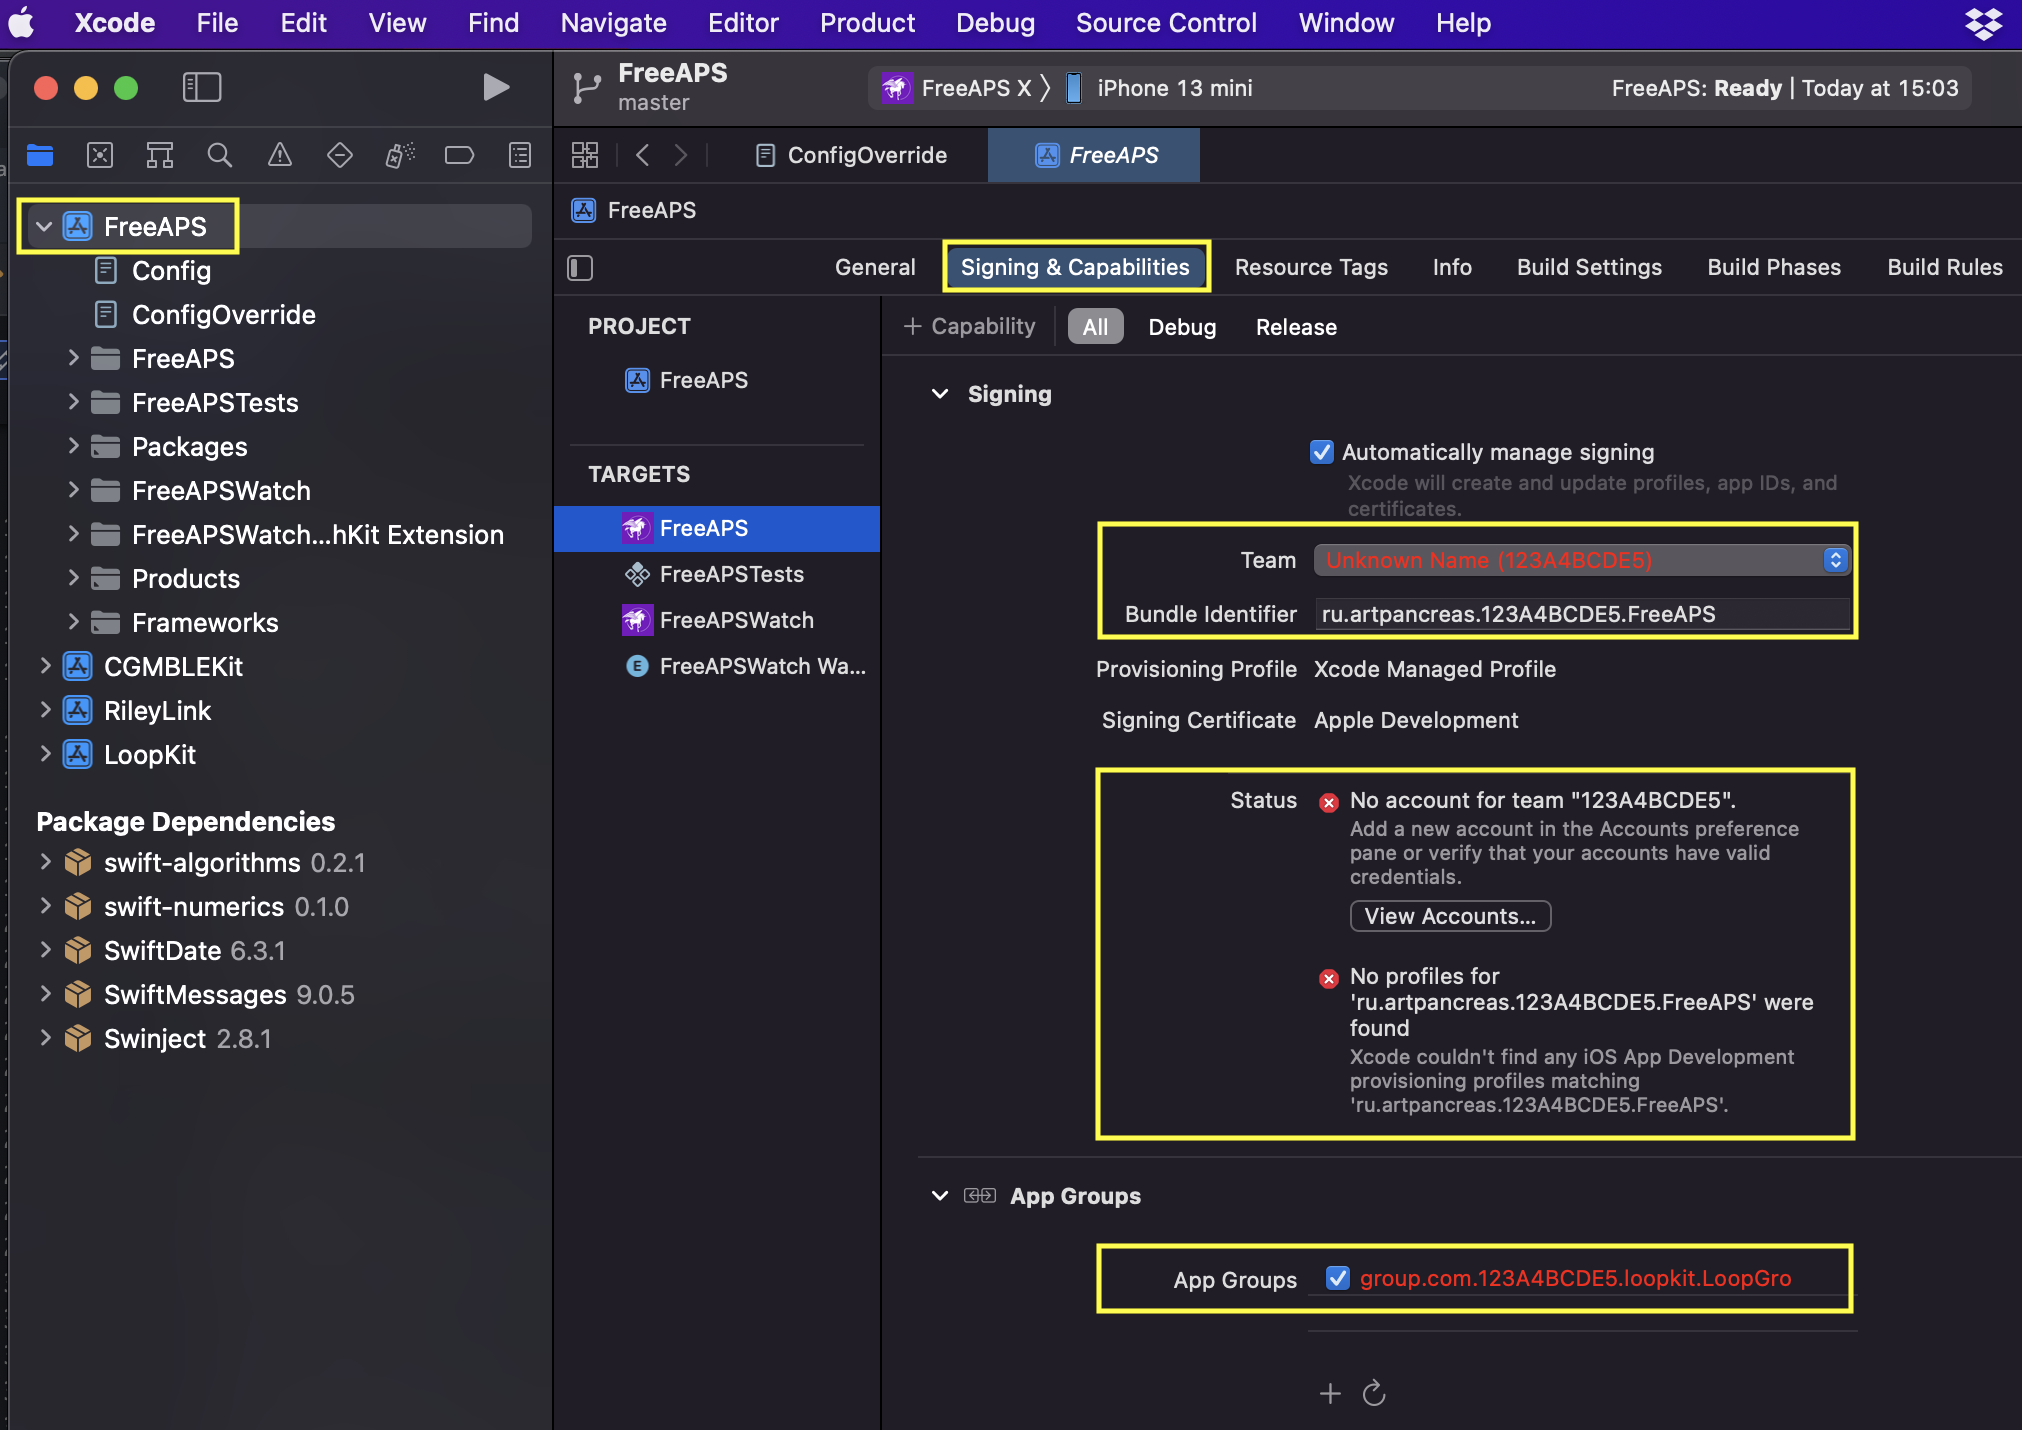
Please verify that your team ID was entered correctly by clicking on “Signing & Capabilities”. If you see any red text as shown below, you should double check that you copy/pasted a valid developer team ID, and that the “//” signs were deleted from the beginning of the last line
If you do not see any errors in Signing & Capabilities, please plug in your phone, unlock it, and select “Trust this Mac” if this is the first time building to that phone. Select your phone from the dropdown menu on the top, making sure you don’t select one of the simulator models. Please see LoopDocs Step 14 – Connect Your iPhone to Computer if you need more details for this step.
Now everything should be ready for you to click the play button to build FreeAPS X to your iPhone.
Build errors
Should you encounter any build issues, please have a look at the LoopDocs Build errors page. Everything on that page is not relevant for building FAX, but many potential issues will likely be covered there. You will also get useful advice about what info to provide if you need to ask for help. When you have identified the error message(s), please use the search tool in LoopDocs to see if your error is mentioned.
When running the BuildFAX script, one possible error is related to missing command line tools in Xcode.
If you need it, you are most likely to get help if asking for in one of these groups:
- Telegram: FreeAPS X discussion group
- Discord Loop Group free-aps-x channel
- Facebook groups like “Loop and Learn” and “Looped” may become useful too, but these groups are still mostly focussed on Loop
Only for old-time FreeAPS-X users:
If you have been using FreeAPS-X for a long time (back when you had to create your own bundle identifier) please use Bjorn’s instructions in Telegram to transfer from the custom id to the standard one.
Xdrip4iOS as CGM source
If you want to use Xdrip4iOS as a CGM source via “shared app group”, you must also build Xdrip4iOS from source. Please follow the instructions to the letter, paying special attention to the instructions to Configure the Override File. These instructions are similar to what was described above for building FAX. You should not manually edit the bundle identifier or app group, as these are already correctly set in both FAX and Xdrip4iOS (older instructions required changes that are no longer needed).
Utility scripts included in the Build FAX script:
- Clean Derived Data
- Xcode Cleanup (The Big One)
- Clean Profiles and Derived Data
Option 3 is recommended for each time that you build. It resets the provisioning profiles so you get a full year from the date of the build and cleans out previous build stored data that might interfere with a successful build.
Update FreeAPS X
Update FAX using Xcode
Open Xcode. If your FreeAPS X workspace is not already open for you, you will probably find it in the recent projects. It will look like this:

Click Source Control. Choose “Fetch changes”.
Click Source Control again and then “Pull…”.
Select the branch to pull from. The correct branch should already be selected for you, so if you have built from master, select master. If you have built from dev, select dev.
Click “Pull”.

The last steps are only relevant if you made any changes to the code, or did not follow the build instructions for the ConfigOverride file:
– You may see a a pop up asking to stash your changes. In that case, name the stashed changes to something that is meaningful to you (e.g “signing targets”).
– Select “Apply Stash After Operation”.
– Click “Stash and Pull”
The FAX code is now updated. That was easy, wasn’t it? If you followed the build instructions including editing the ConfigOverride file, the targets are already signed, and you are ready to build the FreeAPS X app to your phone.
Update FAX using Terminal
Locate the directory where the BuildFAX script saved the code. The directory is named after the branch and the date and time for the download:
Master branch: /Downloads/BuildFAX/FAX-Master-[date]/freeaps
(e.g /Downloads/BuildFAX/FAX-Master-220122-1352/freeaps )
Dev branch: /Downloads/BuildFAX/FAX-dev-[date]/freeaps
(e.g /Downloads/BuildFAX/FAX-dev-220108-1827/freeaps)
Open a Terminal window at the freeaps directory by right-clicking on it and select “New Terminal at Folder”.
In the Terminal window, type the following, and hit enter for each line:
git stash
git pull
git stash pop
The FAX code is now updated. That was easy too, wasn’t it? To open the workspace in Xcode, type
xed .
and hit enter. If you followed the build instructions including editing the ConfigOverride file, the targets are already signed, and you are ready to build the FreeAPS X app to your phone.
Verify successful updating of FAX code
To check that the FAX code was successfully updated, you can find the BUILD_VERSION in the FreeAPS Config file. Compare this to the expected version in the FreeAPS X GitHub Releases page.

FreeAPS X Code Customization
Code Customizations
Several customizations are provided – use at your own risk.
Modify Enact Bolus Confirmation
Reason: In earlier versions, if FaceID or Fingerprint fails, user cannot get to passcode screen.
NOTE – this is fixed in release/0.2.0, the graphics in this section are from release/0.1.23
File: freeaps-0.1.23/FreeAPS/Sources/Services/UnlockManager/UnlockManager.swift
Graphic shows original code on left, with two options on the right.
This portion NOT needed for release/0.2.0: If you prevent the “if block” starting on line 28 from executing, the biometric ID is attempted once and then the passcode is presented.
To Remove Bolus Confirmation
For release/0.1.23, if you replaced the entire segment with success, the bolus is enacted as soon as user taps on Enact Bolus. This still works for release/0.2.0 but the original code and line number are different from the graphic shown.
For release/0.2.0, it is much easier to simply add a “false, ” between the if and context on line 28 similar to what is in loopdocs customization instructions.

For Omnipod – Continue Looping Past Reservoir = 0
Reason: FreeAPS X, by default, stops looping when the reservoir reports 0 u of insulin.
Omnipods will attempt to deliver up to 4 u more past report of 0 u of insulin. There is no guarantee that many units are available. Once 4 u is successfully delivered, pod session ends with an alarm. If pod senses no more insulin can be delivered, pod session ends with alarm.
File: freeaps-0.2.0/FreeAPS/Sources/APS/APSManager.swift
Line # 190:
from:
guard reservoir > 0 else {
to:
guard reservoir >= 0 else {
For Omnipod – Extra Bolus at Insertion
If you prefer to have an extra bolus at Insertion, without it counting as IOB.
File: freeaps-0.2.0/Dependecies/rileylink_ios/OmniKit/Model/Pod.swift
Line: 65; for freeaps-0.2.1.1, this is on Line 72
Default:
public static let cannulaInsertionUnitsExtra = 0.0 // edit to add a fixed additional amount of insulin during cannula insertion
More Reading
Tim Street wrote a nice introduction to FreeAPS X:
The OpenAPS documentation covers how you configure a “rig” to talk to your pump and CGM. So the pages about the “rig” can be skipped. With FreeAPS X, your “rig” is your iPhone with RileyLink compatible device. However, this is the core documentation of how to use the OpenAPS algorithm, so spend some time with the OpenAPS docs.
OpenAPS Pages to Review
- How OpenAPS Makes Decisions
- OpenAPS Preferences and Safey Settings
- Note- iPhone Preferences menu for FreeAPS X replace entries in json files for OpenAPS
- Optimize Your Settings
- Advanced Features
- Summary for Clinicians
- Nightscout with OpenAPS
Katie DiSimone wrote about OpenAPS as well as Loop. As usual, her blog plots are well worth your time. (Note: list generated by a search of seemycgm for OpenAPS – provided in chronological order)
SeeMyCGM Pages to Review
- https://seemycgm.com/2017/03/08/remote-monitoring-of-openaps/
- https://seemycgm.com/2017/05/10/openaps-new-feature/
- https://seemycgm.com/2017/05/12/openaps-smb-and-panda-express/
- https://seemycgm.com/2017/05/15/openaps-and-hormones-and-smb
- https://seemycgm.com/2017/05/24/openaps-and-uam/
- https://seemycgm.com/2017/05/24/under-the-hood/
- https://seemycgm.com/2017/09/02/loop-vs-openaps-update/
- https://seemycgm.com/2017/09/05/moving-between-diy-closed-loop-systems/
- https://seemycgm.com/2017/10/29/fine-tuning-settings/